Whether you host a podcast or are creating video content, interviewing is essential. Here are some of my experiences and tips for working with VIPs, Celebrities and Experts.

Some of the most nervous and challenging subjects I’ve worked with on camera are celebrities, CEOs and subject matter experts. These are the very people you’d think are fairly comfortable in front of cameras.  Yet it’s worth remembering that not every celebrity loves cameras. The reasons can vary widely, and it’s useful if you can do your homework to be prepared.

For example, I once interviewed a brilliant scientist who shared in our pre-interview that he had ADHD, a condition which had eventually led him to a career in science to unlock the genetic secrets of the human condition. This scientist admitted that he was unlikely to stay focused for more than five minutes at a time. He was right. I had to let him get up and check on experiments and talk to colleagues in between every question. Flexibility is sometimes the key to a happy interviewee, and thus a better interview.

A brilliant conductor was another fascinating and tricky interview subject. Having worked with her for many years, I was not surprised that she almost directed our production from her seat. Allowing an expert to feel in control is often a key to creating a successful interview dynamic, even though you are always keeping track of the story arc and important points you want and need to draw out for your particular audience.

I once worked with a Very Famous TV Personality whose name shall not be included here. That’s because her on-screen bouncy persona was a far cry from her real approach, which was difficult and anxious. Her assistant was equally challenging. We had to do many takes, some of which I had to carefully cajole out of her, because I realized no one on her team was willing to admit to her that she had made some mistakes. Yet I knew that she would want a perfect take, and wouldn’t approve anything less (and frankly, neither would I). When conducting interviews with experts, VIPs and celebrities, part of your job is also managing feelings, and managing the managers.

As an interviewer, director or producer, you need to be ready for everything.  Your best weapon is knowledge. Your second is patience. And for challenging VIP’s, the crew or tech team needs to be 100% on their toes, with no chit-chat. Everyone needs to exude the confidence that you will make this person look and sound their absolute best.


This blog post is partially excerpted from my content creator’s guide The Producer’s Playbook: Real People on Camera (Routledge Press).

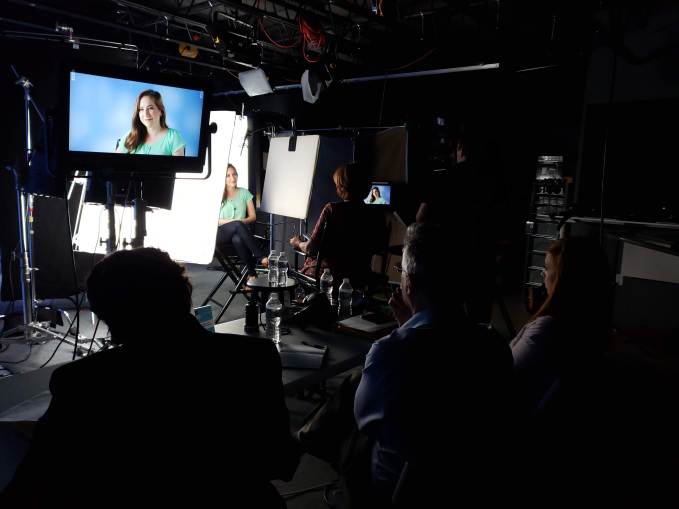
Frederick Van Johnson’s POV while he records us on his podcast This Week in Photo

I’m so honored to have been interviewed on #podaster @frederickvan amazing series This Week in Photo, the world’s most popular photography podcast network! We had a great discussion about creativity, filmmaking, and what it takes to be a multihttps://thisweekinphoto.com/-platform content creative. #podcasts #ageofconversation #contentcreator #storyteller #videoproduction #GALSNGEAR

The Transcriptives Premiere Pro plug-in allows editing video with text (courtesy Digital Anarchy)

Transcripts rule. If you are a video content creator like me, you know that getting transcripts of interviews, and even transcribing b-roll audio, can massively speed up the video editing and publishing process. Here’s how.

Faster Video Editing. If you’ve ever scrubbed through footage listening for soundbites, you know it’s time-consuming. Even listening at double speed. It’s much faster to scan through an accurate transcript, then pull your top pick soundbites together into a timeline for final selects.

Making Your Selects. Once you have your interviews in hand, it’s time to log your best takes.  Thankfully there are great digital tools to make the transition from field shoot to final edit seamless. In FinalCutPro, you have the Lumberjack system, which lets you live log on your shoot and tag soundbites in the field, and also set up your top soundbites for editing. For those working in Premiere Pro, the Transcriptives plug-in from Digital Anarchy is a great way to go to simplify the soundbite-tagging-to-editing process. And these systems also speed up your captioning and subtitling workflow.

Blogs, Websites and Social Posts.  Be sure everyone in your communications department has access to your interview transcripts.  Transcripts are great source material for pull quotes that can be sourced for social media posts, blogs, publications and e-newsletters.

Captioning. Once you have accurate transcripts, captioning is a breeze. You can output your final transcript of a show and upload it directly into a publishing platform such as Vimeo or YouTube. Or you can create your own captioned version. (Processes like Transcriptives captioning workflow makes this extremely simple.) My preference is for the latter.  After speaking to many users for the accessibility chapter of my book Nonfiction Sound and Story for Film and Video, I learned that auto-captioning can not only be inaccurate, but also poorly timed. If a caption comes too early, for example, it can give away a story line without letting the viewer draw those conclusions for themselves.

Where to Get a Good Transcript.  These days, you can get fast turnarounds on transcripts—often in a matter of hours. For straightforward and brief interviews, I’m a fan of automated services like https://www.rev.com/. For people with accents, those who speak very fast, or lengthy interviews, I prefer the human touch with a service like Noble Transcriptions. Don’t count on the YouTube automated tool. For $1-2/minute, accurate transcripts are your best tool for storytelling.

Amy DeLouise is a video content creator helping organizations tell a better story.

You’ve got some interviews lined up for a company video. Maybe you’ve already got a list of questions. But will you be able to turn those soundbites into a compelling story? Before filming, you may need to do some brief writing. Namely, a short creative brief, conduct some pre-interviews, and develop a story arc. As a professional video scriptwriter and producer, here are a few of my top tips for some writing that will help your video end product.

  1. Creative Brief. What’s the look and feel you want to convey? Who is your target audience? And what are you trying to get them to feel and do after watching the video? What are the delivery specs and what platforms will it play on? Who has final approvals? What’s the budget and timeline for delivery? Detailing the answers to these questions is essential before you roll on any footage. Often, I like to add storyboards to my creative briefs, so everyone can discuss looks and agree on a visual style. You can use tools like Storyboarder Plot or the more high-powered Frameforge. You can certainly reference other videos on YouTube, but be careful. If you don’t know the budget and timeline of those projects, you could be setting a goal you can’t achieve. And don’t forget that even a crappy sketch can help everyone on the team visualize the look!
  2. Pre-Interviews. Whenever possible, conduct pre-interviews. If you’ve pre-interviewed someone, you can build rapport in advance of lights-camera-action. You can also get a sense of key stories and anecdotes and how to approach your questions. You’ll also get a sense of their personal style, which will again help you conduct a better interview. A solid story arc drawn from these interviews should include a brief introduction or back story, a key challenge or turning point, and a resolution. And ideally also an opening hook. (I’ll leave that for another post.) By pre-interviewing your subjects and thinking through your story arc in advance, you’ll get better soundbites and avoid missing an important element.
  3. Story Arc. Now that you’ve got the lay of the land in terms of who your main characters are and the stories they can tell about your subject, you can start to lay out a possible story arc. This doesn’t mean you can’t stray from this idea once you are in the editing room. But a solid story arc can help you decide which questions are most essential when you have limited time for interviews. You can also start to understand what additional visuals you might need to tell the story, whether they are stock images, archival content, or b-roll.  For my video projects, I like to have these elements in my story arc:
    1. An opening hook—something to grab the viewer and get them into the story.
    2. Background – an extremely brief explanation of what we’re talking about—which can come from interview soundbites or a narrator.
    3. Central challenge or conflict – every story needs some tension, even nonfiction. What created change in the central character’s life? What did the product do to change the world of the customer?
    4. Resolution – Some final thoughts or a resolution of the central challenge gets you to the end.
    5. Call to Action – If you are making a fundraising or advocacy video, there may be something you want viewers to do after watching. “Get involved by clicking this link” etc.

You don’t have to be a Hollywood screenwriter to make your interview-based nonfiction story better. But you will find that doing some writing in advance of filming will improve your video storytelling and impact. In an upcoming post, I’ll talk about taking the story arc plan and transcripts and turning them into an editing script.

For more details on video scripting, see my LinkedIn Learning course http://bit.ly/HowtoScript

Well produced videos are essential for informing and engaging audiences during virtual and hybrid events.  In this article I’ll take a look at some best practices to ensure your pre-recorded videos support the success of your virtual event.

1. Make Video Content Snackable – At a live event, you have a captive audience. Plus the dynamic that occurs when everyone is together in a room.  In this world, a 5 minute or longer video can keep the room engaged. Not so for virtual events. Everyone who tunes in has other distractions in their immediate area—children, pets, emails, and work on their desktop that needs attention. Enter snackable content—short videos that engage, entertain and inform, while propelling the theme of your meeting or event. Roll-in videos for live events, with the exception of panels—and we’ll talk about them in a moment—should be no longer than 2 minutes.  Better yet, a series of 1:00 spots that work to set the stage for a particular session, or act as transitions between sessions.  This length will also allow your video to be hosted natively on Instagram during or after your event—an added social media bonus.

2. Video Transitions are Key – At a live event, when a speaker is late, you can ask your MC to take a few more questions from the audience. At a virtual event, remote feeds can fail and tech problems can result in your team needing more time.  If you lose your audience now, you might not get them back. Having a few videos of various lengths available to you to play at any time can be helpful. This could be a Year in Review video, a light-hearted video put together by staff, or a promo montage of upcoming sessions. Having at least two videos of 2-3 minutes in length on standby each day of your virtual event will give you a little breathing room for those unexpected moments. You should also create a little animated “We’re having technical issues but we’re working on it!” video that you can play if all else fails. After all, you are effectively putting together a broadcast and you don’t want any dead air.

3. Ensure Your Video Plays Back Properly – It’s amazing how often organizations spend tons of money producing great video content, but forget to test the delivery formats prior to output. If you are streaming your event from a platform like YouTube, be sure your video is optimized for that platform rather than asking YouTube to convert your specs. The conversion process will introduce garbage—technical term!—that you don’t want in your video.  Unless your platform is a professional 4K streaming system or specifies otherwise, I’d recommend a frame rate of 30fps and 1920×1080 as your video delivery size, with an audio sample rate of 44.1Khz and bitrate of 128kbps.

4. Provide an Engaging Home for Your Videos – Where will your videos live after the event is over? Can you set up a hub on your website or the event site? You can still host the videos elsewhere, such as your YouTube or Vimeo page. But putting the videos on your website—with and without subtitles—can ensure more hits post-conference. Be sure you have already created written content that explains the context for each video, and any action steps you want the audience to take after watching. For example, if your event was a fundraiser, a video featuring one of your organization’s projects can include a link to a Donate Now button. Don’t wait until after your event to set up your video hub. Be sure to write the copy and links in advance, and have it ready to go.

While we hope for live events to be back soon, virtual and hybrid events will be the norm for the future. And well-designed pre-recorded video content will be a big part of those events.

Amy DeLouise is a producer, interviewer and moderator for live and virtual events and videos.

Virtual events and interviews are here to stay. And if you’re tapped to conduct an interview remotely, you’ve got a big task ahead of you. Prepping to host a virtual webinar or remote interview has some similarities with doing it live, but also some major challenges and differences. I’ll share a few common obstacles and how to solve them in this article.

  1. Curation is Key. One of the keys to a successful remote interview or panel is being sure you have the right person for that conversation. Just because someone is a subject matter expert, for example, does not make them a great interview subject, particularly in the virtual environment. Whenever possible, I pre-interview people—a “screen test” of sorts—via Zoom so that I can see if they will work well in a virtual environment. Some questions I want to answer during this brief 20-minute video call are:
    1. Is this person lively and engaging?
    2. Do they have good examples and stories to tell?
    3. Does their topic fit into a larger story arc for the panel or event?
    4. Will they need a lot of cueing for answers?
    5. Do they tend to go on too long in their answers? (Cutting off someone in a virtual interview is much more difficult than in a live event—you’ll have to literally interrupt them, which is not ideal, as opposed to using body language in a face-to-face setting).
  2. What Will the Audience See and Hear? Thinking through in advance what the audience will see and hear is critical to making any successful video content, but especially for virtual or livestreamed events. When your audience isn’t captive, they can easily switch the “channel” and consume some other content if yours isn’t compelling. So how can you convey the story and keep them engaged?
    1. Does the interviewee have good lighting, audio and camera setup? If you are not shipping a camera-in-a-box setup or having a local camera operator film the interview, you may need to rely on Skype or Zoom. Someone who looks like they are in the witness protection program will need your help to get their lighting better positioned for their face.  I’m a fan of the Aperture M9 LED, the Fox Fury Rugo, and the Lume Cube Mini as affordable options that you can ship to an interview subject. I’m not a fan of ring lights, by the way, as they do make the “devil eye” look for most people, and don’t work well at all for those with glasses. For audio, I love my Saramonic lavalier. I have the Blink 500 because I can also pair it with my phone for social media recordings (if buying this system, be sure you get the correct version–there are ones for Android or iPhone). The MPOW headset is a decent low-cost choice, if you don’t mind a headset in your shot. Or the Rode smart lav if you prefer a lavalier. Remember that computers and drives have loud fans, so be sure your subject is as far away from them as is practical when you are ready to record.
    2. Does your “talent” have some visuals to share? What format are they in? If a Powerpoint, can you view slides in advance and make suggestions for what will be most engaging? (Often I suggest some top selects, and we can provide the entire deck as a downloadable resource for registered participants afterwards.)
    3. If this is a video interview rather than a panel discussion, will we have access to photos or video clips to intercut into the interview at a later date? Sometimes I will even have the interview talent record a side-angle shot of themselves with their phone for some of our questions and send that to me, so I have an angle to intercut with the primary shot. (Teach your interviewee to use WeTransfer.com or Hightail.com to share large files so they don’t eat up your Dropbox or Box drive space.)
  3. Be Prepared. As an interviewer, the pressure is always on us to be more prepared than the interviewee(s). Most importantly, we need to set the subject at ease, and ensure that they feel they are coming across well. Here are some ways to be sure you are prepared.
    1. Create a flow or outline for the conversation—one that will make sense for the audience and your event theme. Be sure to share it in advance with all panelists, including which questions or themes you are likely to ask which people (which is based on your pre-interview and research homework).
    2. Have at the ready a primary set of questions that follow your flow, but also a secondary set of questions ready to go in case the audience isn’t highly interactive.
    3. Teach less experienced interviewees how to speak directly to their camera, rather than to their screen. This will make an enormous difference in how the audience responds to them. And as interviewer, remember to do the same. I put a sticky note with a smiley face just below my web camera lens as a reminder. (For more tips, here’s a LinkedIn post I wrote about looking better on your next virtual call.)
    4. In a webinar format, be sure you take advantage of the “green room” feature and give panelists a custom link so that they can enter the webinar early, get a chance to chat with each other and with you. You can take this time to review the format and agreed-upon flow or outline, test microphones, adjust lighting, and be sure everyone’s internet connection is stable (turning off notifications—here’s how on a Mac and here’s how for Windows 10, disengaging Dropbox syncing, and disconnecting any VPN). And don’t forget to take a group screenshot for PR purposes!

Moderating virtual panels and conducting interviews in virtual settings can be challenging. But with these strategies, you can make the experience fun, engaging and rewarding for you, your interviewees and your audience.  In a future article, I’ll get into the tech side of remote video recording. I’ll also be doing a post on how to get the audience engaged in a virtual panel discussion, so stay tuned!

Amy DeLouise is a digital media expert and producer/curator/moderator for virtual events.

Coming up with client profiles can be a fun exercise in strategic planning.

As busy creatives, we are always racing the clock. We might be rushing to deliver a portfolio of new photos for a client. Or working overnight on a new website. Or finishing a series of final edits in order to deliver videos for a virtual conference. Whatever we are working on, we will probably do it again some time soon. So it makes sense when marketing our creative businesses to develop packages of products and services that help our customers get what they need, when they need it, and help us deliver quality for a consistent price. One of the ways we can do that is by planning ahead for common types of projects for predictable types of customers and organizations. In short, building customer profiles.

Creating prospective customer and project profiles can actually be a lot of fun. It’s a good strategic planning exercise for a company retreat. First step: put yourself in the client’s shoes. What are the problems they need to solve? What would be the financial and time pressures on such a project? What “pain points” could you solve for this type of company or organization?

Figuring out the answers to these questions before you are faced with the precise project can help you market your company and your solutions, and set yourself apart in a crowded field. They can also help you consider how much time and staffing you’d need to accomplish those projects quickly.

Let’s say you own a graphics design company. There might be four profiles that show the different problems your customers face and the solutions you can provide. You want to focus on different sized customers, because their structure affects the kinds of problems they face.  A small company might need help with a website design or refresh. They don’t have anyone in-house with the time to do it. They can update the content themselves, once you set it up for them, but they have a limited ability to do major design changes. For this kind of client, you can create a template approach that can be customized, since they won’t want to spend large amounts of money. But it is also a great gateway project for other, bigger projects.

By contrast, a large company with a big in-house design and communications shop might have a completely different set of deliverables for a website redesign. They may want not just a new website but an entirely new logo and brand redesign, along with brand identity elements for every channel, and a brand guide on how to use them. There might be feedback from multiple different departments along the way, with a more time-consuming workflow as a result.

As you think through all the different kinds of problems clients have, you can design a few profiles that fit. And that gives you the type of customer you are pitching to, so you can design appropriate marketing campaigns and sales strategies.  These profiles are also useful frameworks as you develop package pricing and bids.

Whether your creative business is large or small, creating detailed client and project profiles is a great way to jump-start your strategic planning for the New Year.


This blog post is adapted from Amy’s upcoming LinkedIn Learning course on Launching Your Creative Business. See LinkedIn Learning for more of her video courses. 

Patty Jenkins directs Wonder Woman

#Storytellers are #LEADERS in many cultures. They preserve the past. They envision the future. And they help us frame who we are. So why are so few women the leading storytellers of our times?

 
It’s not for lack of trying.
 
As the numbers from the recent USC Annenberg #Inclusion initiative shows that across 1,200 leading films, women only direct 4%. And numbers behind the camera are equally dismal. Despite small inroads, the film director’s chair remains white and male. Much like the CEO chair and the Boardroom Chair.
 
But, we also know that women make highly competent #leaders. Women score higher than men in most leadership skills.
 
So what’s the deal?
 
There is often a #confidence gap. Society’s confidence in us as leaders. And women’s confidence in our own story as leaders. Which affects our ability to hone leadership skills, find mentors and champions, negotiate for the better positions/pay, and own our leadership brand.
 
This fall I will be joined by several incredible women who have helped boost my own skills and confidence as a leader at our #GALSNGEAR Taking the Lead Women’s Career Accelerator Workshop this fall. Check out these carefully planned sessions to take your leadership to the next level—we’d love to have you! 
Please follow me @galsngear on instagram for up to the minute info on this and other initiatives to promote women in the media and film industry.

The global shutdown is forcing organizations to re-examine the value of their archives–an internal “stock image library” they already own.  Here’s a case study I wrote about last year that is even more relevant today, showing how you can create content with impact that tells an organizational story and propels your brand message–all with internally owned content.

Fulbright Prize Introduction from Amy DeLouise on Vimeo.

The project is a motion graphics opener I just produced for the Fulbright Prize event in Berlin, where this highly regarded international prize was given to Angela Merkel, Chancellor of Germany. As these stories so often start, we had brainstorming meetings about how to tell the history of the prize in 2 minutes. In addition, we wanted to show the breadth of the work of the association giving the prize. Also, we needed to list past prize winners and years. Oh, and show all of their images, some of which were not available in the organization’s archives. Also, we needed to include quotes about the importance of the prize and the value of international exchange from well-known people and prize winners. And…we also needed to incorporate the thematic blue color of the organization’s logo, and create a look and font style that could be incorporated into the print, social, and other materials for the event.

This is all great stuff and just the kind of thing that gets my creative juices flowing! So here was our process:

Step One: Identify existing content that helps tell the story. This involved digging into archives for old footage, transcripts of old speeches, and old newsletter articles. Also pulling together archival images of past awardees, and more recent digital images of association events. We determined in this phase that the quality of archival clips were not good enough to pull footage (and it would make the show too long anyway), so we would look instead for quotes that told the story.

Before the magic begins, we start with raw materials–archival content from a variety of media sources

Step Two: We boiled down the best quotes from the broadest representation of past prize winners, and people who had spoken about the importance of the Fulbright international exchange program, and shaped it into a script. (Note: Scripts don’t have to include spoken words.)

Step Three: We identified the best images of awardees, and then we had to license and request some additional ones, so that we had a full compliment of images of past awardees at the high resolution required for large-screen HD presentation.

Step Four: As part of the image curation process, I pulled together those “action shots” I thought best exemplified the work of the association–as a convener, educator, and source of ongoing cultural exchange.

Step Five: I selected several cuts of music–pacing is critical for animation, and we “cut to the music”, so we have to choose this first. We settled on a piece we felt had rhythm, excitement, and momentum. I also like to lean towards more full orchestrations for videos that will air live in a large space, with quality speakers.

Step Six: Since this was airing abroad, which has different frame rate specs than the US, we sent a test file to the A/V company at the on-site location, to be sure it worked well from their end before we started to animate.

Step Seven (really steps 7 through 10): My graphics team and I went through multiple drafts of the story, honing and tweaking until we–with our client–felt we had the best representation of the story.

Step Eight: We rendered out our final files and shared them, making sure they had been proofed (so many names!)

Step Nine: We delivered the final files via link to the company in Berlin who was running all the A/V at the event.

Final Step: This step hasn’t happened yet, but we need to have the video audio-described, so that a blind or visually impaired viewer can still access this content. Accessibility is not just a matter of captioning, though captions are essential for videos with spoken words and narration.

Here’s the big takeaway: saving your archival assets is essential–you never know when you will need them. Digitizing them at high quality, retaining the originals, and metatagging them with important information is even more important. Your media archive contains gold, if you know where to find it.

Amy DeLouise is a video producer, author and trainer, helping organizations tell their best stories. She has a new LinkedIn Learning course out on Multi-Platform Storytelling, will be giving workshops at NAB Show this Spring (see Speaking page).

People come to my workshops all the time looking for help with scriptwriting. Often they are videographers and editors who are tasked with managing the entire creative process, from concept through delivery. The classic “one man/woman band”. If that person is you, or you manage that person, this blog post is for you. (Note: If you have hired a pro scriptwriter to work with your team, then you will only need to brainstorm steps 1 and 2, and then share feedback on revisions through the production process.)

  1. Start With Outcomes, Not the Shoot. Don’t worry, it’s a pretty common experience. Folks rush out to shoot some footage, and only later try to figure out how to piece that footage into a story. But unless you are a news crew, this is not the best workflow. Start instead with your Outcomes—what is it that this video should accomplish? Choose not more than three. And ideally just one main outcome. And be as specific as possible. For example, “Our top outcome from this video is to increase sign-ups for our next conference.” That’s pretty good. But even more specific is “Our top outcome from this video is more sign-ups among 35-50 year-olds for our next conference.” That outcome will drive your creative process, including the key elements of your story arc.
  2. Develop a Creative Vision. What’s the look of your piece going to be? What’s the editing style? What kind of music? Is there a graphical theme? Color scheme? Can you link to some videos that have a similar vibe to what you want? (And how much did those cost? Remember that big brand ad campaigns may look deceivingly simple, but actually use complex production techniques or post-production skill sets.) Your creative vision can be represented by a few simple frames on a Powerpoint. Or you can use tools like Storyboarder Plot or the more high-powered Frameforge. But don’t forget that even a crappy sketch can help everyone on the team visualize the look. A tool I’ve just started using for mood boards is Milanote. You can include all the elements discussed in your kick-off meetings, color swatches, fonts, deliverables lists, even links to inspiration videos.

    Milanote project board

  3. Write an Outline. If you have an interview-based production, then whenever possible conduct pre-interviews. I can’t tell you how many people come to me talking about scrubbing through footage looking for soundbites, which is a big waste of time. If you’ve pre-interviewed folks, then you already have a sense of who your primary characters and who your supporting characters will be. You can outline your story, which will help you construct your interview questions (more on that in a future blog post). You will want to consider what the peak of the story arc will be—what is the main heart or turning point of this story? Whether you are talking about a new piece of software or the mission of a nonprofit, you will still need a peak to the story that makes people want to keep watching. The other pieces then fall into place: the backstory or introduction, the resolution and the conclusion or call to action. This doesn’t mean the entire production can’t evolve organically. But if you have a plan for the story arc before you start shooting, you are more likely to shoot the b-roll shots and cutaways you need to cover the story.
  4. Make a B-Roll List. It’s amazing how many video shoots go forward without this simple tool. Make a list of all the shots you might need to bring your story to life. For reality-based stories, consider little moments—I call them “interstitials”—that can help you transition between scenes, but also deliver some important content. For example, if you are interviewing a young mom and dad, shoot a montage of baby bottles and toys. For a business owner, that might be a tracking shot of awards on her office wall. Once you’ve written your outline, dropped in your potential soundbites and b-roll–well, now you’ve written your shooting script!
  5. Get Interviews Transcribed. Once your shoot is over, you have one more step. Going to my earlier point about wasting time scrubbing through footage, you’ll save yourself enormous time and aggravation if you get transcriptions made of all your interviews, and even some b-roll sound if it is important to the story. You can get transcripts back in a day or two using automated services like https://www.speechmatics.com/ , semi-automated systems like https://www.rev.com/ , or human experts like Noble Transcriptions. For $1-2/minute, you’ll have accuracy not provided by the YouTube automated tool, and you can use the transcripts for all kinds of content—pulling quotes for your website and social posts, SEO keywords, and making revisions in the future.
  6. Cut a Paper Script Before Editing. I know, this seems like wasting time. Why not get right to editing? The fact is, if it doesn’t work on paper, it won’t work on the screen. So take a stab at sequencing your soundbites, figuring out what music cuts fit where, and which b-roll or stock images might best support your scenes. This, in fact, is your editing script. Once you build your story arc on paper, then you can hit the edit room. If you are using AVID, you have a built-in tool called ScriptSync that lets you import all your transcripts and conform your edit. Here’s a handy blog post on how that works. In FinalCutPro, you have the built-in tool Lumberjack, which lets you live log on your shoot and tag soundbites in the field, and also set up your top soundbites for editing. For those working in Premiere Pro, the plug-in Transcriptives from Digital Anarchy is a great way to go to simplify the soundbite-tagging-to-editing process. And all three of these systems allow you to speed up your captioning and subtitling workflow.
  7. Make a Final “As Aired” Version. I can’t tell you how often my team goes back to these “final” scripts as we make new versions of our videos. And since we also have all our original interview transcripts, it’s easy to swap out bites if we need to. Always be sure you have a PDF of your final version saved with your editing project files as well as in your desktop files.

Scriptwriting may seem daunting if you didn’t start your career as a writer. But by putting your creative on paper, and then working through soundbites and visual options before hopping into your edit, you’ll be more likely to deliver on stated outcomes. And that will make a stronger ROI for your company’s video investment.

For more nitty gritty tips and tools for video scripting, try my LinkedIn Learning course http://bit.ly/HowtoScript